In Tutorial 7, we learned how to
do hand annotation for complex annotations. In this tutorial
we'll learn how to do annotation for a task with multiple steps,
where later steps may depend on the completion of prior
steps. We'll also learn how you can take advantage of
mixed-initiative annotation (tag-a-little,
learn-a-little) in any or all of the steps. If you're
not already familiar with tag-a-little, learn-a-little annotation,
it would be helpful to review that page before beginning this
tutorial.
Like tutorial 7, we're going to do this tutorial in file mode. We're going to assume that the sample task directory is installed (see step 1 in Tutorial 1 if it isn't).
See the section on starting the UI in Tutorial 1.
The "Sample Relations" task also builds on the sample "Named
Entity" task used in tutorials 1 through 6. The "Named Entity"
task includes the following entity labels:
When you installed the "sample/ne" task folder, it also included
the "Enhanced Named Entity" task used in tutorial 7, and the
"Sample Relations" task that we will use in this tutorial.
The "Sample Relations" task adds one additional entity:
It also adds two spanless relations (Tutorial
7 covered creation and manipulation of spanless
annotations):
We are going to be working with the "Mixed Initiative Annotation"
workflow, which defines three sequential mixed-initiative tag
steps:
The following excerpt from the task definition shows how these
steps are defined and incorporated into the "Mixed Initiative
Annotation" workflow:
    <steps>
      <annotation_step engine='carafe_tag_engine' sets_added='entities'
                       type='mixed' name='entity_tag'/>
      <annotation_step engine='carafe_tag_engine' sets_added='nationality'
                       type='mixed' name='nationality_tag'/>
      <annotation_step engine='trivial_relation_tag_engine' sets_added='relations'
                       type='mixed' name='relation_tag'/>

	...

    </steps>

    <workflows>
      <workflow name='Mixed Initiative Annotation' undoable="yes">
        <step pretty_name='zone' name='whole_zone'/>
        <step pretty_name='tokenize' name='carafe_tokenize'/>
        <step name='entity_tag' pretty_name='tag entities' type='mixed'/>
        <step name='nationality_tag' pretty_name='tag nationalities' type='mixed'/>
        <step name='relation_tag' pretty_name='tag relations' type='mixed'/>
      </workflow>

	...

    <workflows>
You can review the entire task definition in
MAT_PKG_HOME/sample/ne/task.xml. There are three tasks
defined in that file; the "Sample Relations" task is the last one.
MAT comes with the jCarafe tagging engine. We have also
added a "trivial" relation tagger to
MAT_PKG_HOME/sample/ne/resources/python primarily for the purposes
of being able to demonstrate mixed-initiative annotation for
relation tagging steps. However, this isn't an accurate
tagger that you'd want to use for real work. It is possible
to use other engines you supply in your tasks, although the
details of how to do that are currently not documented.
We're going to assume a scenario in which we have ten documents
(voa1 through voa10) tagged with named entity data, and ten more
(voa11 through voa20) with no annotations, and we want to end up
with all 20 documents tagged with all of the types of annotations
the Sample Relations task supports.
If you want to work in file mode, you should create a working
directory somewhere convenient and copy into it the files
MAT_PKG_HOME/sample/ne/resources/data/json/voa1.txt.json through
voa10.txt.json, as well as
MAT_PKG_HOME/sample/ne/resources/data/raw/voa11.txt through
voa20.txt.
We're going to start by using mixed-intiative annotation to add
PERSON, ORGANIZATION and LOCATION tags to the ten unannotated
documents.
First we'll build a model for the "entity_tag" step based on the
ten documents we already have tagged, and use that model to
pre-tag the remaining documents.
We learned to build a model for a simple task in tutorial 2. Since our current
task has multiple trainable steps, we must also specify the step
for which we want to train a model. Here we'll ask the model
builder to build a model for the "Sample Relations" task's
"entity_tag" step. In a shell:
Unix:

$ cd $MAT_PKG_HOME
$ bin/MATModelBuilder --task 'Sample Relations' --step 'entity_tag' \
--save_as_default_model --input_files "YOUR_WORKING_DIRECTORY/*.json"

Windows native:

> cd %MAT_PKG_HOME%
> bin\MATModelBuilder.cmd --task "Sample Relations" --step "entity_tag" \
--save_as_default_model --input_files "YOUR_WORKING_DIRECTORY\*.json"
Let's go ahead and load a document.
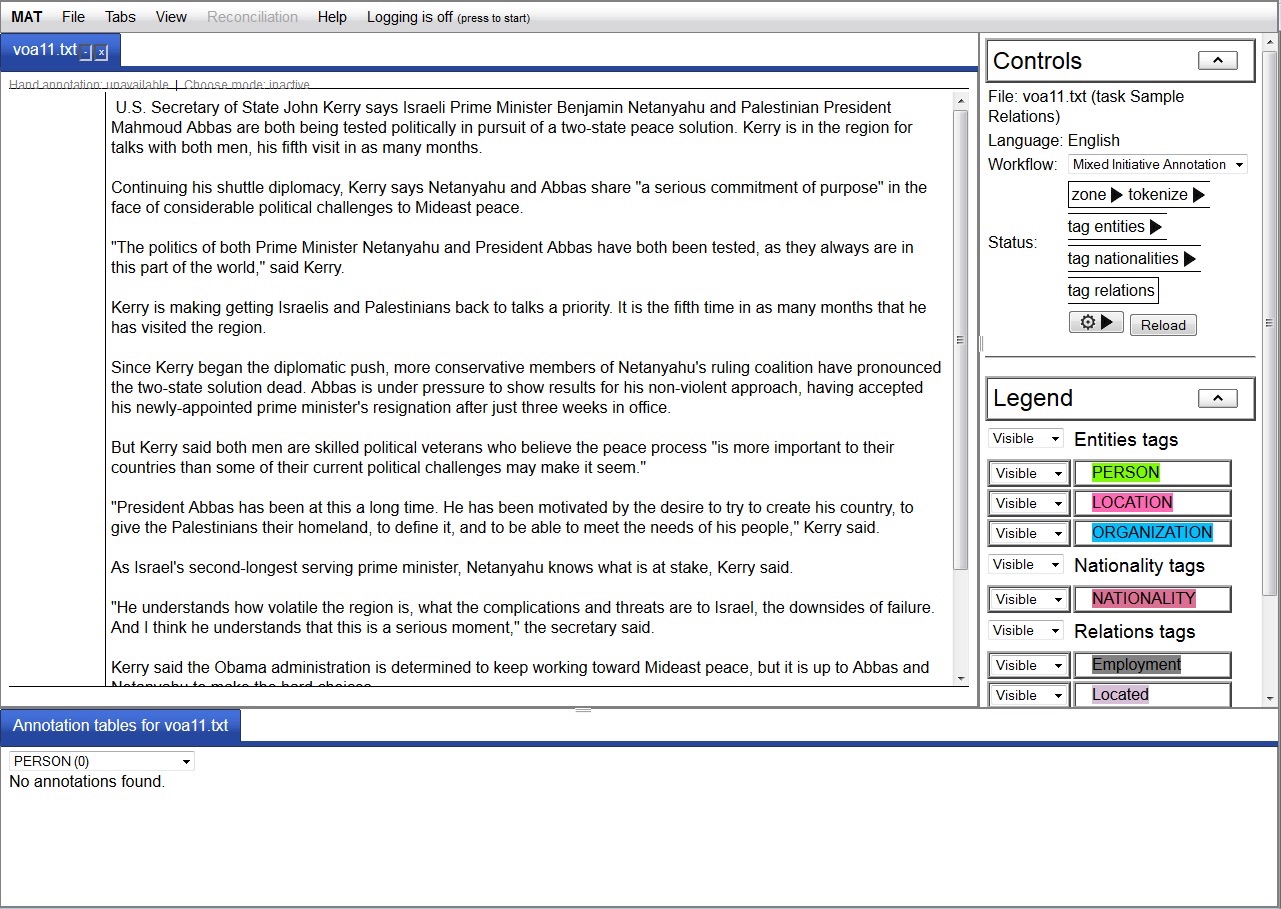
Your window will look like this:

In the "Controls" the panel on the right, you will see that this
file has been opened for the "Sample Relations" task in the "Mixed
Initiative Annotation" workflow. Below the workflow is a
button with a gear and a triangle facing toward the right.
If you hover over that button it will tell you that clicking it
will "Apply zone". Do that to apply the required "zone" step
to the document. A new button with a left-facing triangle
will appear, which would allow you to undo the zone step.
Hovering over the gear button will now tell you that clicking it
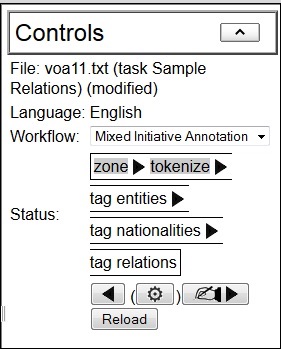
will "Apply tokenize". Do it. Now the "Controls" panel
should look like this:

Hand annotation is now available in the text pane. If you wanted you could annotate the PERSON, ORGANIZATION and LOCATION entities entirely by hand. (Note that you cannot add any other type of annotation at this point -- your annotation is constrained by your current step.) But first, let's autotag the entities using the default model that we just created. Hovering over the gear button tells us that clicking it will "Apply tag entities". Let's do that. Now the document contains jCarafe's proposed entity tags, which you should correct by hand in the UI using the hand annotation skills you learned in tutorial 1. After you are happy with the annotations, use the button with the writing hand on it to indicate that you are finished with hand annotation for this step. After that you should save the file (as in step 6 of tutorial 1) and close it. (Although you could go on to do nationality tagging in that file, we're going to do entity tagging for all the documents first before moving on to nationality tagging. That way we can use the mixed-initiative loop for each step.)
At any point after correcting some of the autotagged files, you can build a new model, which will take into account your corrections and hopefully do a little better job of autotagging the remaining documents. Make sure that you don't have any files open in the UI when you create your model. Once you have finished autotagging and correcting all of the documents, we will move on to the nationality tagging step. (If you want to take a shortcut, you can copy the already entity-tagged sample copies of the remaining documents from MAT_PKG_HOME/sample/ne/resources/data/json/ to your working directory.)
Now we're going to do almost the same thing we did with entity tags with our nationality tags. But because we don't have any documents that are already tagged with nationalities, we'll have to tag a few by hand before we can build a model.
Use File->Open File... to select voa1.txt.json from your
working directory. Be sure to set the document type to
mat-json. MAT should remember your selections for task, language
and workflow, so you should not need to set those again.
Since the entity tagging step is done in this document (and all
the others) you will be in hand annotation mode for the
nationality step. If we had a model for nationality tagging
we could apply it at this time, but since we don't, we'll proceed
with hand annotation. You will only be able to add
NATIONALITY tags. Find the instances of nationalities, such
as "North Korean" and tag them. As a shortcut, once you've
added one instance of a nationality such as "North Korean" you can
click on that annotation and choose "Autotag matches" from the
context menu. A popup will tell you how many matches it
tagged, if any. For "North Korean" it will autotag 5
matches. (Be careful with sub-strings -- you would not want to
autotag "Korean" until after tagging all instances of "North
Korean" and "South Korean" first.) When you've finished
tagging the nationalities in this file, use the hand button to
indicate that you are done with hand annotation, save and close
the file. Repeat with voa2 through voa5. Be sure to tell MAT
that you are done annotating nationalities in each file by using
the hand button before saving the file.
Now build a default model for the "nationality_tag" step, using the files voa1 through voa5 as input. Again, remember that you should not have any files open in the UI when you create your model. In a shell:
Unix:

$ cd $MAT_PKG_HOME
$ bin/MATModelBuilder --task 'Sample Relations' --step 'nationality_tag' \
--save_as_default_model --input_files "YOUR_WORKING_DIRECTORY/voa[1-5].txt.json"

Windows native:

> cd %MAT_PKG_HOME%
> bin\MATModelBuilder.cmd --task "Sample Relations" --step "nationality_tag" \
--save_as_default_model --input_files "YOUR_WORKING_DIRECTORY\voa[1-5].txt.json"
Now as you open the remaining files for the nationality tagging
step, you can apply the automatic tags first and then correct
them, as we did for the entity tags. Since there are very
few nationality tag examples in the text, the model won't have
learned much, and you'll still have to do a lot of the work by
hand. You can improve the model as you go along by
re-building after you have corrected some more files, but even
with 20 files, it's never going to do a great job of nationality
tagging.
Shut down your Web server by typing "exit" in the window where
you started the Web server. More details here.
If you're not planning on doing any other tutorials, and you
don't want the sample tasks hanging around, remove them as
follows:
Unix:This concludes Tutorial 8.
% cd $MAT_PKG_HOME
% bin/MATManagePluginDirs remove $PWD/sample/ne
Windows native:
> cd %MAT_PKG_HOME%%
> bin\MATManagePluginDirs.cmd remove %CD%\sample\ne